How to Unfreeze the QuickBooks Desktop?
QuickBooks (QB) is a multifaceted, user-friendly, and powerful accounting software that has helped businesses and accountants increase productivity by streamlining their workload. Along with its advantages, QuickBooks Desktop is frequently riddled with a variety of bugs that might be very frustrating for you. This article will discuss every factor that can cause QuickBooks Desktop to freeze, as well as numerous solutions. Also, you will learn how unfreeze the QuickBooks desktop. Thus, keep reading...!
What are the factors leading to QuickBooks Desktop
Freezing up?
Are you attempting to use QuickBooks
Desktop, but each time you try, it freezes? A situation like this could arise
for a number of reasons. Following is a list of some of the most notable and
frequent causes:
•
The company file name being longer
than permitted may also instigate the error.
•
Corrupt hard drives used for
installing QuickBooks Desktop may also be a reason.
•
A malfunctioning or outdated
operating system may also lead to frequent freezing of the software.
•
Company files may be larger in
size than the allowable limit.
•
A Damaged DDF and user
reference files may also lead to freezing of the QuickBooks software.
•
Incorrect firewall and internet
settings.
•
A broken "QBWUSER.INI"
file may also lead to this error.
•
Background-running programs
take up too much space, thereby contributing to the frequent freezing of the
QuickBooks software.
•
Corrupt installation files for QuickBooks.
Convenient
Steps to Unfreeze QuickBooks Desktop
The following is a list of some of the most
effective ways to unfreeze QuickBooks Desktop. Make sure to implement
each strategy in turn. Jump to the next strategy if the first one doesn't work.
Step 1: Remove
Temporary Internet Files, including Cache
•
To begin with, hit the Win
and R keys at the same time.
•
The screen displays the Run
Command window.
•
In the Run box, you need to type
"Control" and press "OK."
•
Then, head to "Network
and Internet" and then hit the "Internet Options."
•
Now, tap on the 'Delete'
button under the 'General' tab.

•
Choose website files and
temporary Internet files
•
Pick the "Delete"
button.
•
The temporary files removal
process might take some time.
•
After finishing, pick "Apply"
and then "OK."
Step 2: Setup QuickBooks
Tool Hub
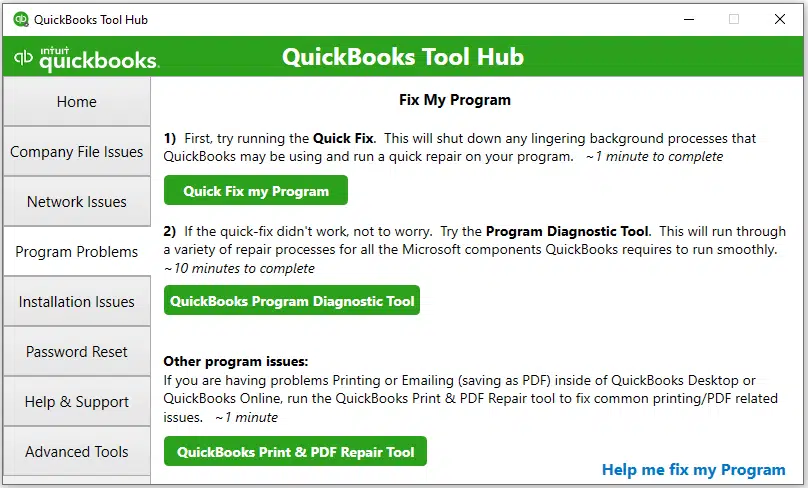
·
The first step requires you to Download QuickBooks
Tool Hub and subsequently install the same on your system.
·
Once the installation has
culminated, open the QuickBooks Tool Hub.
Step 3: Run QuickBooks
Install Diagnostic Tool

•
You are supposed to opt for the
"QuickBooks
Install Diagnostic Tool" under the "Installation Issues"
option in the Tool Hub.
•
Next, opt for "Yes"
to agree to the required license agreement.
•
Now, start repairs using the
tool.
•
Restart your computer after
you're done.
•
Verify that the problem has
been fixed. If not, move on to the next step.
Step 4: Terminate QuickBooks
Desktop
The following actions should be followed to
end QuickBooks Desktop:
•
Double-click on the QB Desktop
while simultaneously pressing the "Ctrl + Shift" keys.
•
Keep hitting on the "Ctrl
+ Shift" keys until QuickBooks is open on your computer. The "No
Company Open" window will be activated.
Step 5: Updating QuickBooks
Desktop
•
Start off the QuickBooks
Desktop software and then head to the Help menu, followed by opting for the Update
QuickBooks Desktop option. Then, opt for "Update Now" in
the top right corner.
•
Choose the "Reset
Update" option from the menu.
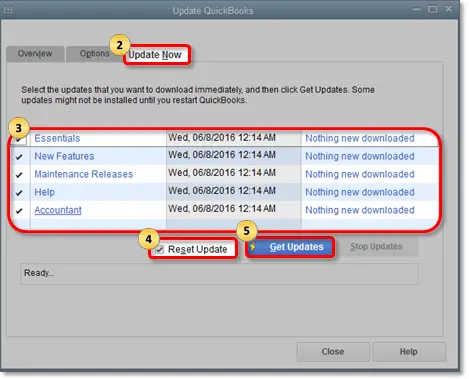
•
Now, opt for "Get
Updates."
•
After the Update is complete,
shut down QuickBooks.
•
Now, check if you the step
helped to unfreeze QuickBooks Desktop.
Step 6: Creating and Restoring Portable Company File
•
If available, you can use the
QB capability to create a portable file to overcome the data problems.
•
The steps listed below can be
used to create a QuickBooks Portable File:
•
Navigate to File after opening the
QuickBooks File.
•
Hit on "Create Copy."
•
Choose "Portable
Company File" and then hit on "Next."
•
Decide the location wherein you
want to save the portable file.
•
Hit on "Save"
and then tap on "OK."
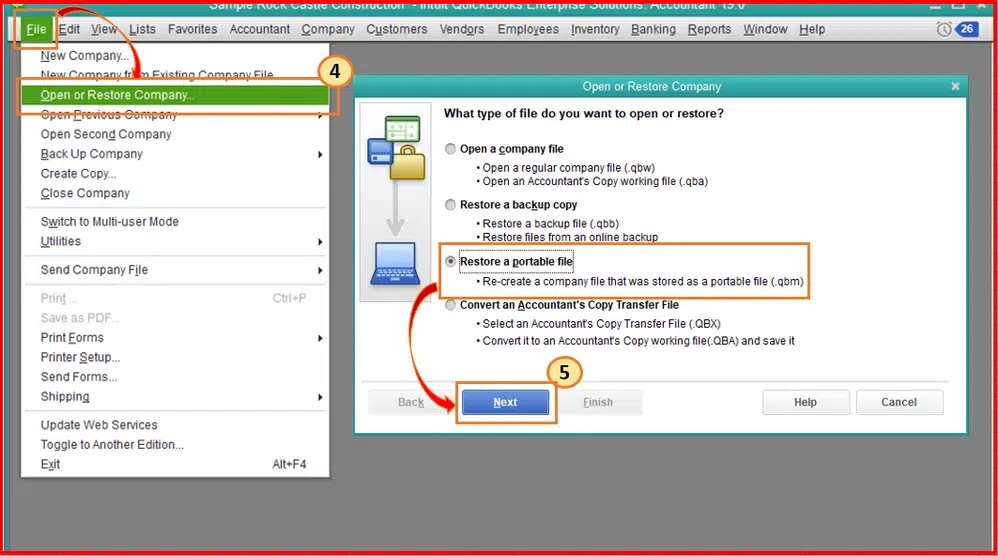
Steps for Restoring the
Portable Company File
The following actions should be followed to
restore the portable company file:
•
Tap on "Choose Open"
or "Restore Company" from the File menu.
•
Choose "Restore a
portable file" and then hit "Next."
•
Choose a "portable
company file" to save it to.
•
Hit on Next.
•
Restore the location of the
company file.
•
Finally, hit on Save.
Step 7: Run
QuickBooks File Doctor
•
Initially, download the
QuickBooks Tool hub from the Intuit website.
•
Afterward, tap on the "CTRL+J"
keys to access your download folder.
•
From the list of downloads,
double-tap on the QuickBooksToolsHub.exe file.
•
To allow this app to make
modifications, opt for "Yes."
•
Hit on "Next"
to install the tool, and then hit on "Yes" once again.
•
Pick "Next,"
then choose "Install."
•
Hit on "Finish" when
the installation is finished.
•
Now, tap on the Run QuickBooks
File Doctor under the "Company File Issues" tab.

•
Choose the company file by
hitting on "Browse."
•
Now, you are supposed to choose
‘’Check Your Network and Files.’’
•
Hit on "Continue."
•
After entering the QuickBooks
Admin password, tap on "Next."
•
Start the scan now. Depending
on the size of the company file, it can take some time. Your problem is fixed
after the scan is complete.
•
Verify that the problem has
been fixed. If not, move on to the next strategy.
Step 8: Uninstall
and Reinstall QuickBooks
Before you uninstall QuickBooks, you have
your license and product number in hand. Afterward, you should uninstall and
reinstall the software either manually (from the Control Panel) or by using the
QuickBooks Clean Install Tool.
Step 9: Run the
Verify or Rebuild Data Utility for Data Damage
Follow the procedures listed below to run
the Verify Data utility:
•
Proceed to "Utilities"
from the "File" menu.
•
Now, hit on the "Verify
Data.’’
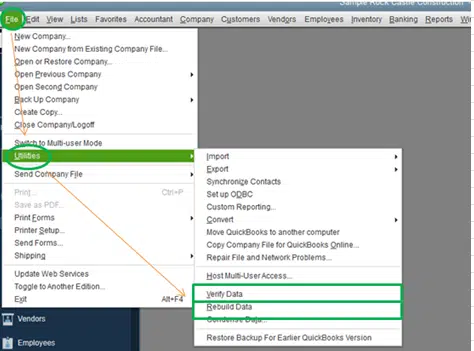
•
If the tool detects any damage,
again head to the "File’’ menu.
•
Then, advance to the Rebuild
Data, and then hit on Ok.
•
When the damage has been
repaired, tap on "OK."
•
To confirm that there is no
longer any damage to the company file, run the Verify Data tool once more.
Step 10: Verify
Your Company File's Character Limit
The name of the QuickBooks company file,
including the four characters for the extension, cannot exceed 64 characters
(.QBW). If the name of your company file does not comply with the following
criteria, QuickBooks may occasionally freeze. Keep track of the file name's
character limit and rename it if it exceeds 64 characters if your company file
name is too long.
After implementing all the above steps, it
should be easier for you to unfreeze QuickBooks Desktop, but if the
problem persists, please speak to our 24X7
QuickBooks error support experts via our helpline i.e., 1-800-761-1787.

QuickBooks software can lead to certain glitches? A proper QuickBooks product of latest version makes the accounting and bookkeeping process smooth and easy. If you are a small or mid-sized business owner and switching to this innovative accounting software, you’ll automatically get the most updated version of QuickBooks. In case you are already a user, you must update QuickBooks Desktop version to the latest release whenever a new service or feature is released.
ReplyDelete