How to Resolve the QuickBooks Payroll Error 12031?
.jpg)
QuickBooks error 12031 usually shows up when users try to update their copy of the QuickBooks Desktop application. This piece of writing shall apprise you of all the information you need, including the different avenues to fix QuickBooks Error 12031 and the most common reasons triggering this technical snag.
We strongly suggest that you read this
whole article carefully and take each of the preventive steps to resolve
QuickBooks Error 12031.
Reasons that may lead to QuickBooks Error 12031
•
Poor internet connection may
lead to this error.
•
This error may also be a result
obstruction caused by the firewall.
•
Incorrect SSL settings may also
incite QuickBooks Error 12031.
How can I get QuickBooks Error 12031 resolved?
You can follow these fixation methods in
order to rectify the QuickBooks error 12031:
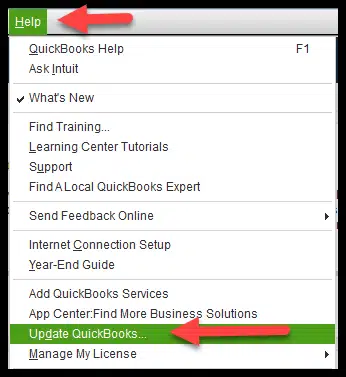
Fixation 1: Update QuickBooks desktop
•
Start up QuickBooks first.
•
Move to the Help menu.
•
Choose the option to update
QuickBooks.
•
Then, check to see if there are
any updates, and if there are, download them.
•
Now, you have to close
QuickBooks. After the app has been closed, restart it.
•
When asked if you want to let
an update download, you need to click on Yes.
•
Check again to see if Error
12031 still reoccurs.
Fixation 2: Make
changes to Internet Explorer settings
•
First, you have to close the
QuickBooks program.
•
After that, open the Internet
Explorer web browser.
•
Subsequently, choose Tools.
•
In Tools, opt for Internet
Options.
•
Soon after, advance to the
Security tab, followed by the Content tab.
•
After going to the Content tab
in this section, click on Disable.
•
You then need to type in the
password before disabling the content advisor.

•
Under the connection option,
choose the option to Never dial a connection.
•
Right after, use the DUN
(Dial-Up Node) and confirm your choice of ISP.
•
Press the OK button next.
•
Click on LAN Settings.
•
The next step is to check the
box to find the settings automatically.
•
Also, be sure to uncheck Use a
proxy server option.
•
Now, you need to write down the
IP address and port.
•
If the port is not set to port
80, uncheck the box for Use a proxy.
•
Click OK.
•
Hit on the option to Restore
Advanced Settings under Advanced tab.
•
You now need to click on the
option to Use TLS 1.0, Use TLS 1.2, and Use TLS 1.2.

•
Make sure to choose TLS 1.0
instead of TLS 1.2, and then click on Ok.
•
Close Internet Explorer, and
then restart your computer.
•
Update QuickBooks, and then
check if QuickBooks Error 12031 got rectified.
Fixation 3: Clean
Install QuickBooks desktop
Perform a clean installation of QuickBooks
desktop using clean
install utility:
•
In the beginning, press the Windows
and R keys at the same time.
•
The next step requires typing
Msconfig. Then hit on Enter key.
•
The window for system
configuration will show up.
•
Next, click on the General tab.
•
Choose Selective Startup and
uncheck Load startup items.
•
After that, click OK.
•
Now, open Control Panel from
the Start menu and then choose Programs and Features.
•
Look for QuickBooks in the list
of installed apps and pick it.
•
After that, choose
Uninstall/Change option, and then hit on Uninstall.
•
Choose Done.
•
After successfully uninstalling
QuickBooks Desktop, go to the download folder and look for the QuickBooks
installation file (with the .exe extension).
•
Double-click on it to initiate
the installation process.
•
Follow the instructions on the
screen to finish the installation.
•
Click on Finish to culminate
the installation.
•
Now open QuickBooks and try to
update it. We hope that the QuickBooks Error message 12031 will be
fixed. If that doesn't work, try to switch back to the Normal Startup mode.

Fixation 4: Revert
to Normal Startup
•
Open the Run window at the
start.
•
For that, press and hold the
Windows and R keys.
•
In the Run window, type
Msconfig.

•
Press the Enter key after that.
•
Choose the Normal startup mode.
•
After that, hit on Apply.
•
Choose OK.
•
Turn your computer off.
Fixing QuickBooks error message 12031
should be quite easy after adhering to the set of fixation methods discussed in
this article. If you still end up with this technical error, there is no need
to fret as our QuickBooks
error support team of experts is there to assist. All you need to do is
call us at our helpline i.e., 1-800-761-1787 and let our experts help you out.

Nice post. I used to be checking constantly this blog and I am impressed! Extremely useful info particularly the ultimate section 🙂 I take care of such information a lot. I was seeking this certain information for a long time. Thank you and best of luck. Data damage on your QuickBooks company file | How to Write off bad debt in QuickBooks
ReplyDeleteThis is really helpful post and very informative there is no doubt about it. I found this one pretty fascinating and it should go into my collection. Keep writing.QuickBooks error code 3371 | QuickBooks error code 1311
ReplyDelete