How to Convert Your Desktop QuickBooks Data to the Cloud
.jpg)
It is time to make the switch to QuickBooks Online if you would like to be able to access your QuickBooks software from any location. To move a QuickBooks Desktop file to QuickBooks Online is typically brisk and uncomplicated. You can use this guide to convert from QuickBooks Desktop Pro or Premier to any version of QuickBooks Online, with the exception of the Self-Employed edition.
Easy Steps to Move Your QuickBooks Desktop File to QuickBooks Online
Follow the steps that are mentioned below and by the end of this blog you will be able to convert a quickbooks desktop file to quickbooks online.
Step 1: Get your desktop file ready
Ensure that QuickBooks has the most recent update.
Simply pressing Ctrl and 1 on your keyboard will ensure that your Total Targets value is lower than 750,000.
Produce a hard copy of the report on your sales tax liability. After your move, you'll need it to make adjustment entries in your journal. To do so :
View your vendors and payables list, go to the Reports menu and then select that option. Select the Liability for Sales Tax.
Choose All from the dropdown menu located next to Dates.
Choose Save as PDF from the dropdown menu located above the Print button.
After giving the file a name and selecting where you want it to be saved, click the Save button.
Step 2: Your QuickBooks Desktop file should be transferred to QuickBooks Online.
For QuickBooks Desktop Premier or Pro
Log-in as administrator and import companies file
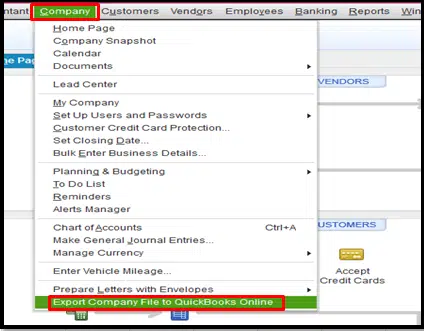
Select Export Company File to QuickBooks Online under Company after going there.
Choose to begin your export.
Log in to your QuickBooks Online as the administrator.
Choose the QuickBooks Online company that you want to replace with your company file by selecting Choose online company.
Choose Continue.
If you use QuickBooks Desktop to track inventory.
Then enter the as of date after selecting Yes to bring them over.
If you want to add new items to QuickBooks Online later, choose No.
In the text field, type Agree, and then click Replace.
Navigate Replace, then select Yes to replace the data.
For quickbooks desktop enterprise
For the desktop company file you want to move, log in as the administrator.
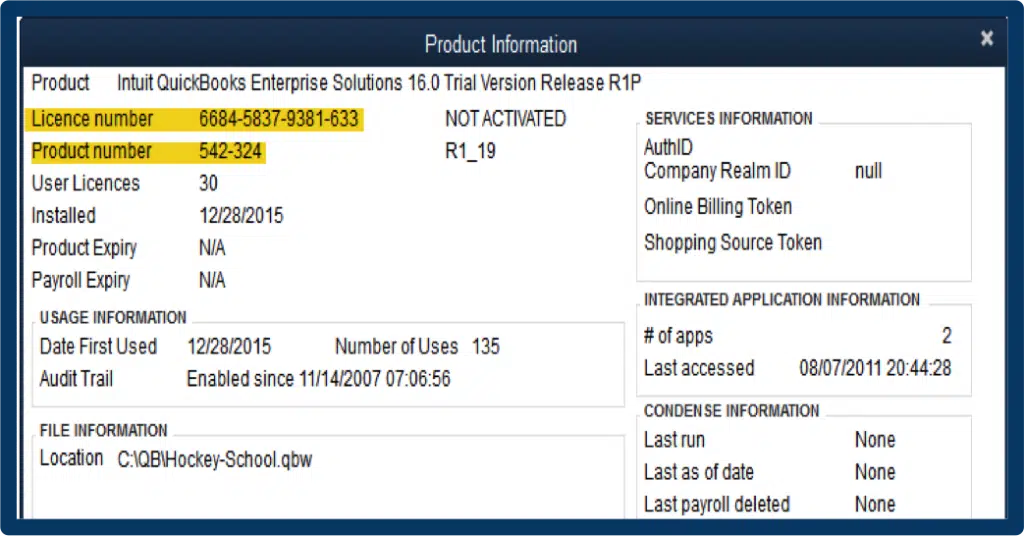
To open the Product Information window on your keyboard, press Ctrl + 1.
The export window will appear when you press Ctrl + B + Q and OK.
Choose Get started from the export window.

Log in as the company administrator for your QuickBooks Online account.
When choosing a QuickBooks Online company to replace with your company file, first click Choose online company.
Pick Continue.
If you use QuickBooks Desktop for inventory tracking:
Then enter the as of date after choosing Yes to bring them over.
If you want to add new items later in QuickBooks Online, click No.
Navigate Replace after typing "Agree" in the text box.
Choose Yes, then choose Replace to replace the data.
Step 3: Get yourself prepared to use QuickBooks Online.
Let's get you started with QuickBooks Online after we've finished setting up your company.
Establish a connection with your bank or credit card account.
Now you can create and send invoices to yours customers
Keep track of your bills and pay them using QuickBooks online.
With the help of these approaches, you'll have no trouble moving the file from your desktop version of Quickbooks to the online version. If you are still experiencing problems, or have any questions or concerns about Quickbooks, or if you want assistance moving your desktop file to the cloud, please call our helpline number +1-800-615-2347. Our knowledgeable QuickBooks error support team is standing by to assist you whenever you need them.

Comments
Post a Comment