Fix Issues When Deactivating Bank Feeds in QuickBooks
Bank Feeds constitutes a collection of tools for online banking that QuickBooks makes available to its users. These tools make it simple to connect to the financial institution and subsequent downloading of the transactions. However, there may be an instance wherein you wish to turn off the Bank feeds. This article will guide you through the process of getting a complete understanding of the various issues encountered with deactivating Bank Feeds in QuickBooks software. We will make sure that you successfully deactivate Bank Feeds and resolve any issues when deactivating bank feeds in QuickBooks.
Different ways for getting the Bank Feeds deactivated in
QuickBooks
The below-given methods should assist users
in fixing problems while deactivating Bank feeds in QuickBooks.
1st Method: Updating QuickBooks to the latest release
To ensure that the issues don't pop up
while deactivating the Bank feeds, users should make sure that QuickBooks is
updated to the latest release. For that, the steps to follow are as follows:
•
Launch the QuickBooks Desktop program.
•
After that, select Help and choose the option to Update QuickBooks Desktop.
•
Then, opt for the Update Now option.
•
Now, hit on Get Updates.
•
Watch for the completion of the
updating process.
•
Once finished, hit on Ok and then close the window.
•
You should now restart
QuickBooks and attempt to disable Bank Feeds once more.
•
Hopefully, the error won't show
up this time around. If your problem has been solved, great. If not, adhere to
the next method.
2nd Method: Make use of lists
Restoring the former Order of accounts is denoted
by "sorting your lists." You will be able to disable Bank feeds in
QuickBooks by using lists. Follow the given procedure to carry out the
operation using the "Banking menu":
•
Click the Banking tab.
•
Then proceed to the option to
write the Checks.
•
Click on Pay to the Order of.
•
Press Ctrl and L keys simultaneously.
•
Put a tick in the box next to Include inactive.
•
Then select Name from the drop-down menu.
•
Select Re-sort List.
•
Click on Ok to return the list to its original Order.
In the Edit
menu, you can also access the resort list. You can accomplish it by adhering to
the instructions below:
•
Click on the Edit tab.
•
After that, select the Find option.
•
Select the Advanced Tab.
•
Soon after, hit on Name from the Filter menu.
•
Choose All Names from the drop-down menu.
•
You must now hit the short key Ctrl + L.
•
Check the box next to Include inactive.
•
After that, select the Name option.
•
Choose the option to Re-sort the List.
•
Click on Ok to return the list to its original Order.
•
Once you are done implementing
all the steps mentioned above, check if this method can successfully deactivate
Bank Feeds in QuickBooks without facing any further issues. If the problems
persist, jump to the next method.
3rd Method: Rebuild and verify the company files
Deactivating bank feeds might be made
possible by verifying and recreating the company file. Implement the following
steps to verify data:
•
Click on the File menu, then head to Utilities.
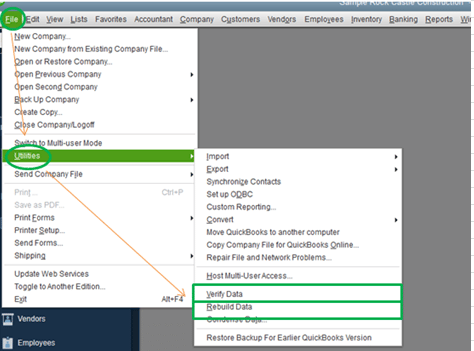
•
Select the option to Verify Data.
•
After that, click on Ok.
•
Be patient while the process of
validating your company file begins.
•
Depending on how large the
company File is, this process could take some time.
•
To view the status of your
company file, click Ok.
How to rebuild data?
The steps below should be followed to
rebuild data.
•
In the beginning, open
QuickBooks and then opt for the File option.
•
Thereafter, hit on Utilities.
•
Then, choose the option to Rebuild Data.
•
Select Ok.
•
Opt for a backup type.
•
Pick Local Backup under the Online
Backup option.
•
Click on Next after that.
•
To complete the backup process
successfully, follow the steps that appear on the screen.
•
When your backup is complete,
QuickBooks will begin reconstructing the company file.
•
Let the Rebuild procedure
conclude.
•
Once finished, try deactivating
Bank Feeds to see if the issues have been resolved.
4th Method: M.S Excel should be used to Deactivate Bank
Feeds
Try manual modification of the File in
Excel before re-importing it. Perform this step if you are still unable to
deactivate the Bank feeds. Also, if you are accessing the multi-user mode as an
administrator, you need to make a transition to the single-user mode.
•
Select File from the menu.
•
After that, Switch to Single-user Mode.
4.1: Process for
Exporting Chart of Accounts:
•
Launch the QuickBooks Desktop from your
Desktop.
•
After that, click on File and then make a move onto the Utilities option.
•
Herein, select Export.
•
Choose Lists to IIF Files from the menu.
•
Then pick Chart of Accounts.
•
The next step is to click on Ok.
•
Now, save the File to the
Desktop.
•
Enter the file name and then
hit on Save.
•
Click on Ok.
•
You must now minimize the
QuickBooks software before moving on to the next stage.
4.2: Procedure to
Edit IIF file in Excel
•
To access the Run Command, press the Win + R keys simultaneously.
•
To open Excel, type Excel and
click OK.
•
Next, open the blank workbook.
•
Go to File and select Open.
•
Select the location where your
IIF file was saved.
•
Choose the stored IIF file and
then click Open after selecting All
Files.
•
Choose Text Import Wizard. Then, click on Next twice.
•
After that, click Finish.
•
Find QB ONLINE at the bottom of the page.
•
For the following items, you
must modify Y to N to reflect the changes:
o
OLBANKINGS
o
OLBILLPAY
o
OLENABLED
o
OLTAB
•
When finished, select File.
•
Select Save.
•
Click Yes to accept the changes.
(c)Importing edited IIF File to QuickBooks Desktop
•
Launch QuickBooks Desktop and select the
File menu.
•
Select Utilities, then opt for the option to Import.
•
Pick the IIF Files
•
Click Ok.
•
Choose Import IIF.
•
Navigate to the IIF file
location.
•
Select the File, then select Open.
•
Watch for the import procedure
to be finished. Once it has been completed successfully, select Close.
We hope the solutions provided in this post
assisted you in resolving all the problems you ran across when turning off Bank feeds in QuickBooks.
Feel free to contact our QuickBooks Technical
Support Team if you run into any problems while putting the strategies
given in this article into practice. Our knowledgeable team will address all of
your issues and offer you superior QuickBooks support.

ReplyDelete'I'm highly impressed by the piece of thoughts you have shared on this portal. all the best connect us on Assignment Help can shed your burden of assignments with a return of qualitative assignments. update QuickBooks to latest release version | How to set up new company file in QuickBooks