Steps to Troubleshoot Webmail Authorization Fails in QuickBooks
Among the various email-related errors that pop up while operating in QuickBooks Desktop, the Webmail Authorization Error in QuickBooks is quite commonly encountered by users. In this piece of writing, we shall unravel all the convenient steps to troubleshooting Webmail Authorization Error in QuickBooks. So, keep read on!
Steps for
troubleshooting Webmail Authorization error in QuickBooks
Follow the steps below to get rid of this
troublesome error in QuickBooks Desktop.
Step 1: Use the PDF
and Print Repair Tool within the QuickBooks Tool Hub
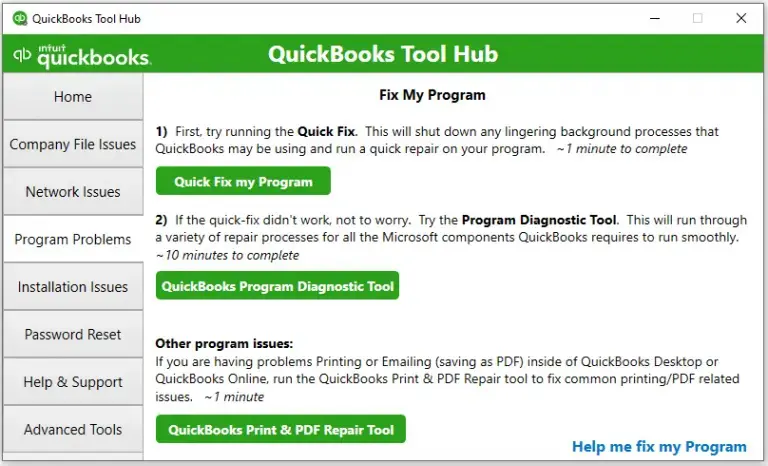
· Initially, you are required to download and install the QuickBooks Tool Hub from Intuit website.
·
Now, launch the Tool Hub and
then advance to the QuickBooks PDF
& Print Repair Tool.
·
In most situations, this will
take care of any problems relating to the PDF capabilities needed to create the
invoice for emailing.
Step 2: Set email
preferences
The configuration file can be incorrect, so
you should try to adjust your email preferences to what they should be.
Depending on your actual email provider, follow these steps:
•
You are initially required to access
QuickBooks as the Admin user.
•
Click the Edit menu and choose Preferences.
•
Next, choose the "My Preferences" tab.
•
Web email, such as Gmail,
Yahoo, Hotmail, etc., is typically wherein the issue occurs.
•
If you utilize the desktop
version of Outlook on your computer, you can choose from a number of
alternatives for sending emails in QuickBooks, including "Outlook"
(not Outlook 365 in the Cloud).
If you are an Outlook user,
then follow the steps below:
•
If Outlook isn't already set
up, you are required to configure Outlook with the email address you want to
use to send emails from QuickBooks.
•
Subsequently, launch QuickBooks
and opt for the Edit menu from the
top menu bar.
•
Choose Preferences, and then
hit on the Send Forms option.
•
Navigate to My Preferences, and then choose Outlook.
•
For testing purposes, you
should close the Preferences Window and try emailing something from QuickBooks
to yourself.
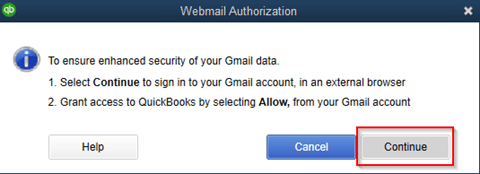
If you are a user of Gmail or
Yahoo:
It only takes a few simple steps to connect
Gmail or Yahoo to QuickBooks so as to send emails. which, while almost same,
change slightly in terms of SSL Security, SMTP Server Configuration, and Port
Configuration, depending on the email service providers.
•
Choose the Webmail radio button under the My
Preferences tab.
•
Type in the email address you
intend to use for QuickBooks emailing.
•
You should choose the SSL Security checkbox in accordance
with the data provided by your webmail service provider.
•
Using the information provided
by your webmail service provider, enter the proper SMTP Server and Port
Configuration.

•
Hit on Ok and try sending the email to yourself and check if you receive
it fine.
Step 3: Make sure
that QuickBooks is updated to the latest release
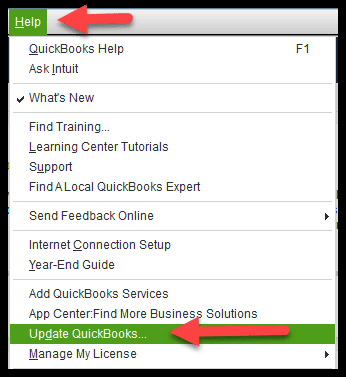
Make sure to update
QuickBooks to the latest release. You can update QuickBooks by launching
QuickBooks, and then hitting on the File menu. Follow up with the Update
QuickBooks option and then proceed ahead to download and install the updates.
We wind up this article, hoping that the
steps encapsulated herein helped you in troubleshooting Webmail
Authorization Error in QuickBooks. However, if you have any query related
to such errors then feel free to contact with our QuickBooks desktop
support team via our helpline i.e., 1-800-761-1787.

This comment has been removed by the author.
ReplyDeleteThis comment has been removed by the author.
ReplyDeleteIntuit the developer of QuickBooks releases latest QuickBooks desktop update after every set time. New updates roll in with new features and functionalities, update to the current features and also some fixes to the bugs. Thus, it is always suggested to update QuickBooks to 2021
ReplyDelete