How to Move Your QuickBooks Company Files to Another Computer?
QuickBooks Desktop is the number one preference of organizations and individuals to manage their everyday accounting work. Small accounting tasks might seem boring and monotonous but are essential for better management and output.
In QuickBooks software, most
digital transactions and other related information are stored in a company
file. So, you must shift the company files whenever you change your system.
Therefore, we’ll look at methods to transfer your QuickBooks desktop files to another
computer. Keep read on!
What is A Company File in QuickBooks?
A QuickBooks Company File stores
the information of all your digital transactions through QuickBooks. For better
management, you can create a separate company file according to the company and
file. You can find a QuickBooks Company File in a folder by looking for the ".QBW”
extension.
Every QuickBooks Company File has
a set storage limit, and the limit varies according to the version of
QuickBooks you are using.
Precautionary Steps to Perform Before
Moving QuickBooks Company File
Here are some of the precautionary
steps that you must take before moving your QuickBooks Company Files to another
system:
- Make
sure that the version of QuickBooks on both the systems, i.e., the old and
new, is the same.
- Don’t
forget to transfer the QuickBooks License and Registration Information to
the new system.
- Alter
the name of company files available on the old system to avoid
transferring the wrong files.
- Update your payroll tax tables if you regularly use QuickBooks Payroll.
Steps to Move Your Company Files to
Another Computer
Checkout the
quick methods to move or reinstall QuickBooks desktop to another computer:
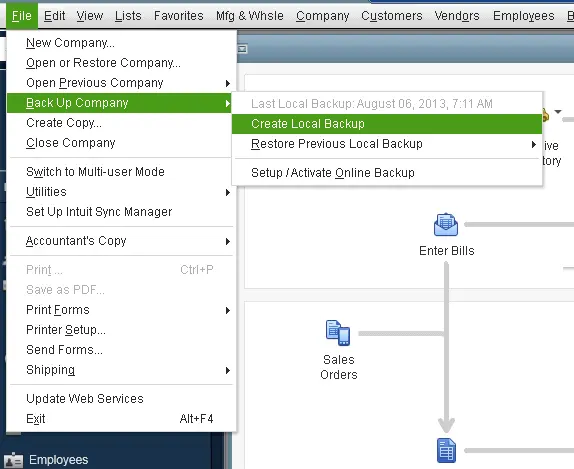
Step 1: Create A Backup on The Old System and Transfer It to The New
System
- First,
open your QuickBooks Desktop application and make sure you use it in
single-user mode.
- Now,
create a backup of the QuickBooks Company File.
- Use
an external Storage Device like a USB or External Hard drive to transfer
the data.
- Copy
the backup you’ve created to the external storage device.
- Finally,
remove the external storage device and connect it to the new system.
- On
the new system, launch the QuickBooks App and restore the backup from the
plugged-in device using the “Open or Restore Company” option, which
you will find under the “File” menu.

Step 2: Shift Complete QuickBooks Data to Another Computer
- Again,
start the QuickBooks Application and press the “Ctrl+1” key
combination to find the location of the QuickBooks Data Folder.
- Click
on the “Windows File Explorer” icon in the taskbar or double-click
on “This PC/My Computer” and go to the location having the complete
QuickBooks Data.
- Copy
the folder and paste it into your external storage drive connected to your
system.
- Connect
the external device to the new system and copy the QuickBooks folder.
- Paste
the QuickBooks Folder on your desktop.
- Finally,
open the QuickBooks Desktop and access the company files using the new
folder.
Step 3: Restore the QuickBooks Data Using “Intuit Data Protect”
- First,
ensure that your Intuit Data Protect plan supports the backup of your
system’s data. If it has the backup feature, you can share the data from
the QuickBooks Data to another system.
- To
begin this step, first create a backup of your QuickBooks Data
on your old system.
- Later,
log in to the IDP (Intuit Data Protect) account and save the backup file
you created earlier to the online backup.
- Switch
to your new system and log in to the IDP account. After entering your login
credentials, restore the backup from there.
Conclusion
Wrapping up, we believe that now
you’ll be able to move your QuickBooks desktop company files to another
computer with the help of the steps mentioned above.
Our team of experts suggests these
steps and if you face any difficulty while following them, feel free to contact
us, or you can also connect with the QuickBooks desktop technical support Team by calling to them at 1-800-761-1787.

Comments
Post a Comment